SSH(SecureShell)是⼀种加密的⽹络传输协议,⽤于在不安全的⽹络中安全地进⾏远程登录、命令执⾏和⽂件传输。
一、SSH服务端配置
1、修改默认监听端⼝
ssh server服务默认监听端⼝为22,为了系统安全,我们可以修改默认端⼝号。对应参数为Port,默认
值为22,我们可以根据规划设置为指定端⼝。
#关闭selinux安全机制,临时关闭
setenforce 0

[root@localhost /]# vim /etc/ssh/sshd_config

...
#Port 22     #不需要修改默认配置,直接复制一个修改
Port 2222
...
2、指定监听地址
如果服务器有多个⽹卡,我们只希望在某⽹卡提供sshd服务,只希望某个⽹段提供服务,则我们可以设置监听地址。
[root@localhost /]# vim /etc/ssh/sshd_config

...
#ListenAddress 0.0.0.0
ListenAddress 192.168.134.130
...
3、禁止root用户登录
centos是默认运⾏root登录的,Ubuntu是默认禁⽌root登录的。如果我们需要禁⽌root账⼾登录,可以通过设置参数PermitRootLoginno,重启sshd服务后可以达到禁⽌root账⼾登录的⽬的。
[root@localhost /]# vim /etc/ssh/sshd_config

...
#PermitRootLogin yes
PermitRootLogin no
...
4、设置失败的认证次数
超过失败次数,连接断开,防止暴力破解
[root@localhost /]# vim /etc/ssh/sshd_config

...
#MaxAuthTries 6
MaxAuthTries 2
...
5、设置banner语言
设置登录前的横幅语,默认是空。Banner参数后参数值为路径及文件名
[root@localhost /]# vim /etc/ssh/sshd_config

...
Banner /tmp/hi
...

echo "你好,管理员" > /tmp/hi
6、访问控制
1、用户黑白名单:配置用户白名单后,默认拒绝其他所有用户
[root@localhost /]# vim /etc/ssh/sshd_config

#白名单
AllowUsers alice bob
AllowGroups sshusers

#黑名单
DenyUsers root guest
DenyGroups nogroup
2、IP黑白名单:配置ip白名单后,默认拒绝其他所有ip
linux系统会先检查/etc/hosts.deny规则,再检查/etc/hosts.allow规则。如果有冲突,按/etc/hosts.allow规则处理。即如果在/etc/hosts.deny和/etc/hosts.allow中,同时有sshd:192.168.11.112规则,则192.168.11.112可以访问主机的ssh服务。
修改后,名单即使生效
白名单配置,需要先拒绝所有,然后允许特定ip
[root@localhost /]# vim /etc/hosts.deny
sshd:     all

[root@localhost /]# vim /etc/hosts.allow
#设置IP网段
sshd:192.168.134.0/255.255.255.0:allow

#设置具体某个IP地址
sshd:192.168.134.130 allow
sshd:192.168.134.131 allow
sshd:192.168.134.132 allow
黑名单配置,直接写入拒绝的ip,默认放行所有
#白名单不要配置
[root@localhost /]# vim /etc/hosts.allow

#直接配置拒绝的ip
[root@localhost /]# vim /etc/hosts.deny

...
sshd:192.168.10.10
...
二、SSH密钥对 免密登录
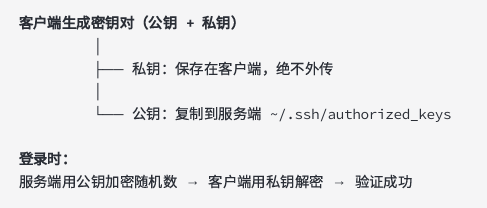
密钥对(KeyPair)是SSH中⽤于⾝份认证的⼀对数学上关联的密钥:公钥(PublicKey)和私钥(Private Key)。
| 名称 | 英文 | 作用 | 保存位置 |
| 公钥 | Public Key | 加密数据、验证签名 | 服务端~/.ssh/authorized_keys |
| 私钥 | Private Key | 解密数据、生成签名 | 客户端~/.ssh/id_xxx |
关键特性:
- 成对出现:公钥和私钥数学关联,必须配对使用
- 公钥公开:可以自由分发,不怕泄露
- 私钥保密:绝不外传,泄露等于身份被盗
- 不可逆推:从公钥无法推导出私钥
公钥=一把锁(可以随便给别人,锁住东西)
私钥=唯一能开这把锁的钥匙(必须自己保管好)
1、密钥对登录过程
2、生成及使用密钥对
ssh-keygen [-t 算法] [-b 位数] [-C 注释] [-f ⽂件路径] [-N 密码短语] 常用示例:
# 1. 交互式生成 (默认 RSA 2048)
ssh-keygen

# 2. 推荐: Ed25519
ssh-keygen -t ed25519 -C "wangluyu0326@163.com"

# 3. RSA 4096
ssh-keygen -t rsa -b 4096 -C "wangluyu0326@163.com"

# 4. 指定保存路径
ssh-keygen -t ed25519 -f ~/.ssh/mykey

# 5. 非交互式 (脚本用, -N 指定密码短语)
ssh-keygen -t ed25519 -f ~/.ssh/id_ed25519 -N "mypassphrase" -C "wangluyu0326@163.com"

# 6. 无密码短语 (不推荐生产使用)
ssh-keygen -t ed25519 -f ~/.ssh/id_ed25519 -N ""
生成的文件:
| 文件 | 类型 | 权限 | 说明 |
| ~/.ssh/id_ed25519 | 私钥 | 600 | 自己保管,绝不外传 |
| ~/.ssh/id_ed25519.pub | 公钥 | 644 | 分发给服务端 |
分发公钥:
#基本用法
[root@localhost /]# ssh-copy-id root@192.168.134.131

#指定公钥
[root@localhost /]# ssh-copy-id -i ~/.ssh/ed25519.pub root@192.168.134.131

#指定端口
[root@localhost /]# ssh-copy-id -p 2222 root@192.168.134.131

#会提示输入一次目标用户密码,然后自动追加公钥
使用密钥登录:
# 默认自动使用 ~/.ssh/id_ed25519
ssh user@host

# 指定私钥
ssh -i ~/.ssh/mykey user@host

# 指定端口
ssh -p 2222 -i ~/.ssh/mykey user@host

# 通过客户端配置文件 (推荐)
# ~/.ssh/config
Host myserver
    HostName 192.168.1.100
    User alice
    Port 2222
    IdentityFile ~/.ssh/id_ed25519

ssh myserver    # 自动应用
3、权限要求
SSH对密钥相关文件和目录的权限非常严格,权限不对会直接拒绝登录
权限要求总览
| 路径 | 权限 | 说明 |
| ~/.ssh | 700(drwx------) | 目录只有属主可访问 |
| ~/.ssh/authorized_keys | 600(-rw-------) | 只有属主可读写 |
| ~/.ssh/id_ed25519(私钥) | 600(-rw-------) | 只有属主可读写 |
| ~/.ssh/id_ed25519.pub(公钥) | 644(-rw-r--r--) | 可公开 |
| ~/.ssh/config | 600 | 含敏感信息 |
| ~/.ssh/known_hosts | 644 | 可公开 |
| 家目录~ | 755 | 不能是777 |
服务端权限设置
# 家目录权限(重要!)
chmod 755 ~
chown user:user ~

# .ssh 目录
chmod 700 ~/.ssh
chown user:user ~/.ssh

# authorized_keys
chmod 600 ~/.ssh/authorized_keys
chown user:user ~/.ssh/authorized_keys
客⼾端权限设置
# .ssh 目录
chmod 700 ~/.ssh

# 私钥 (必须 600)
chmod 600 ~/.ssh/id_ed25519

# 公钥
chmod 644 ~/.ssh/id_ed25519.pub

# 配置文件
chmod 600 ~/.ssh/config

# known_hosts
chmod 644 ~/.ssh/known_hosts
# 客户端
chmod 700 ~/.ssh
chmod 600 ~/.ssh/id_*
chmod 644 ~/.ssh/*.pub
chmod 600 ~/.ssh/config 2>/dev/null
chmod 644 ~/.ssh/known_hosts 2>/dev/null
# 服务端
chmod 700 ~/.ssh
chmod 600 ~/.ssh/authorized_keys
三、常见加密类型
对称加密(SymmetricEncryption):加密和解密使⽤同⼀把密钥。
⾮对称加密(AsymmetricEncryption):加密和解密使⽤不同的密钥——公钥和私钥。
⾮对称加密算法(密钥对)
| 算法 | 全称 | 密钥长度 | 安全性 | 推荐度 |
| RSA | Rivest-Shamir-Adleman | 2048/4096位 | 高 | ⭐⭐⭐ |
| DSA | Digital Signature Algorithm | 1024位 | 已淘汰 | × |
| ECDSA | Elliptic Curve DSA | 256/384/521位 | 高 | ⭐⭐⭐⭐ |
| Ed25519 | Edwards-curve DSA | 256位 | 最高 | ⭐⭐⭐⭐⭐ |
四、SSH客户端使用
1、命令及参数
# 基本登录
ssh user@host

# 指定端口
ssh -p 2222 user@host

# 指定私钥
ssh -i ~/.ssh/id_rsa user@host

# 执行远程命令
ssh user@host "ls -l /tmp"

# 调试模式
ssh -v user@host
ssh -vvv user@host
2、配置文件
可以通过配置将基础参数放到config⽂件,将简化对ssh命令的管理。
vim ~/.ssh/config

Host myserver
    HostName 192.168.1.100
    User derrick
    Port 2222
    IdentityFile ~/.ssh/id_rsa
五、SSH安全加固
1、加固清单
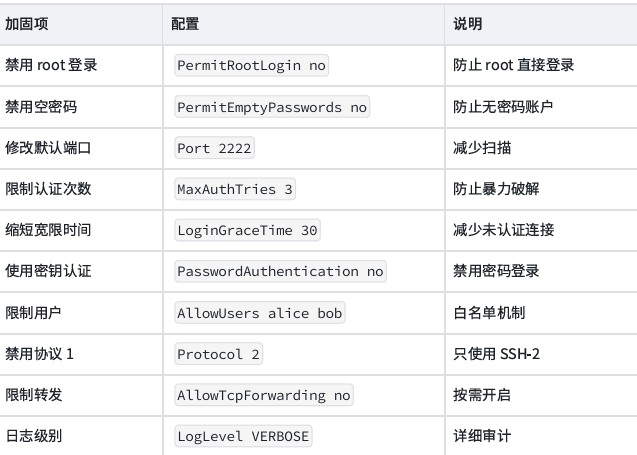
2、推荐兼顾配置示例
# /etc/ssh/sshd_config

Port 2222
Protocol 2
ListenAddress 0.0.0.0

# 认证
PermitRootLogin no
PasswordAuthentication no
PermitEmptyPasswords no
PubkeyAuthentication yes
ChallengeResponseAuthentication no
UsePAM yes
MaxAuthTries 3
LoginGraceTime 30

# 访问控制
AllowUsers alice bob
# AllowGroups sshusers

# 转发展制
AllowTcpForwarding no
X11Forwarding no
AllowAgentForwarding no

# 会话
ClientAliveInterval 300
ClientAliveCountMax 2
MaxSessions 5

# 日志
LogLevel VERBOSE

# 子系统
Subsystem sftp /usr/lib/openssh/sftp-server
3、日志审计
# 查看 SSH 登录日志
tail -f /var/log/secure      # RHEL/CentOS
tail -f /var/log/auth.log    # Debian/Ubuntu

# 查看失败登录
grep "Failed password" /var/log/secure

# 查看成功登录
grep "Accepted" /var/log/secure

# 统计失败次数
grep "Failed password" /var/log/secure | awk '{print $(NF-3)}' | sort | uniq -c | sort -rn

# 查看当前登录用户
who
w
last
六、远程推送命令
1、scp命令:scp基于SSH协议,在本地和远程主机间加密复制文件
常用选项:
| 选项 | 说明 |
| -r | 递归复制目录 |
| -P | 指定端口(大写) |
| -i | 指定私钥 |
| -p | 保留时间戳和权限 |
| -C | 压缩传输 |
| -l | 限速(Kbit/s) |
| -q | 静默模式 |
| -v | 详细输出 |
示例:
# 本地 → 远程
scp file.txt root@192.168.9.12:/root
scp -r dir/ root@192.168.9.12:/root      # 递归复制目录

# 远程 → 本地
scp root@192.168.9.12:/root/file.txt ./
scp -r root@192.168.9.12:/root/dir/ ./

# 指定端口
scp -P 2222 file.txt user@host:/tmp/

# 指定私钥
scp -i ~/.ssh/id_rsa file.txt user@host:/tmp/

# 压缩传输
scp -C file.txt user@host:/tmp/

# 限速 (单位 Kbit/s)
scp -l 8000 file.txt user@host:/tmp/
2、rsync命令:rsync是功能更强大的文件同步工具,支持增量传输、断点续穿、排除规则等。
常用选项:
| 选项 | 说明 |
| -a | 归档模式(等价于 -rlptgoD) |
| -v | 详细输出 |
| -z | 传输时压缩 |
| -r | 递归目录 |
| -l | 保留符号链接 |
| -p | 保留权限 |
| -t | 保留时间戳 |
| -g | 保留属组 |
| -o | 保留属主 |
| -D | 保留设备文件和特殊文件 |
| -e | 指定远程shell |
| --delete | 删除目标端多余文件 |
| --exclude | 排除文件 |
| --progress | 显示进度 |
| --partial | 保留部分传输的文件(断点续传) |
| --bwlimit | 限速 |
| --dry-run | 试运行 |
| --backup | 备份被覆盖的文件 |
示例:
# 本地 → 远程 (通过 SSH)
rsync -avz /root/dir/ root@192.168.9.12:/root/dir/

# 远程 → 本地
rsync -avz user@host:/remote/dir/ /local/dir/

# 指定 SSH 端口
rsync -avz -e "ssh -p 2222" /local/dir/ user@host:/remote/dir/

# 指定私钥
rsync -avz -e "ssh -i ~/.ssh/id_rsa" /local/dir/ user@host:/remote/dir/

# 删除目标端多余文件 (保持完全一致)
rsync -avz --delete /root/dir/ root@192.168.9.12:/root/dir/

# 排除文件/目录
rsync -avz --exclude='*.log' --exclude='node_modules' /root/dir/ root@192.168.9.12:/root/dir/

# 从文件读取排除列表
rsync -avz --exclude-from='exclude.txt' /local/dir/ user@host:/remote/dir/

# 显示进度
rsync -avz --progress /local/dir/ user@host:/remote/dir/

# 断点续传 (大文件)
rsync -avz --partial --progress bigfile.iso user@host:/remote/dir/

# 限速 (单位 KB/s)
rsync -avz --bwlimit=5000 /local/dir/ user@host:/remote/dir/

# 备份模式 (保留被覆盖的文件)
rsync -avz --backup --backup-dir=/backup /local/dir/ user@host:/remote/dir/
路径结尾斜杠的区别(重要):
- rsync -avz /src/ dest/ : 复制 /src/ 目录内容到 dest
- rsync -avz /src dest/ : 复制 /src 目录本身到 dest (变成 dest/src/)